
Wsappx is related to Windows Store and Universal Windows Platform (UWP).
When you try to install, update or uninstall an app from Microsoft Store, you may notice high CPU usage by this process, running in the background.
As some apps (installed from Microsoft Store) update automatically periodically, you may have seen Wsappx running the background while utilizing high CPU usage.
There are 5 methods to fix wsappx high CPU usage problem in Windows 11:
- Disable Microsoft Store’s Automatic Updates
- Use Windows 11 Store Apps Troubleshooter
- Modify Virtual Memory
- Update Drivers
- Scan PC for Viruses
Also Check: Fix Windows 11 Update Pending Install Issue
Method # 1: Disable Microsoft Store’s Automatic Updates
Step 1: Launch Microsoft Store. Click on the profile icon located at the top right-side and open “App Settings“.

Step 2: Disable the “Update apps automatically” option.

Step 3: To manually update an app from Microsoft Store, you can access the Library from the bottom left-side and click on “Get updates” button.

Method # 2: Use Windows 11 Store Apps Troubleshooter
Step 1: Press “Windows Key + I” together to open Windows Settings.
Step 2: Click on “Troubleshoot” in the “System” category.
Step 3: Now, click on “Other troubleshooters“.
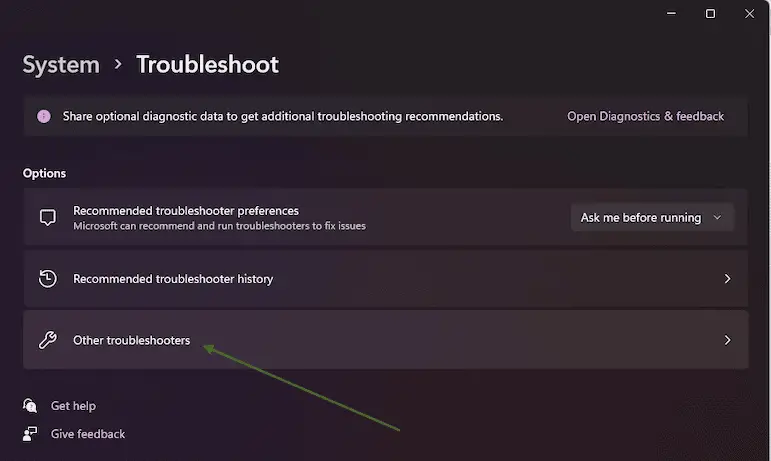
Step 4: Run “Windows Store Apps” troubleshooter.
Method # 3: Modify Virtual Memory
Modifying the virtual memory of your PC can lead to solving this issue on your PC.
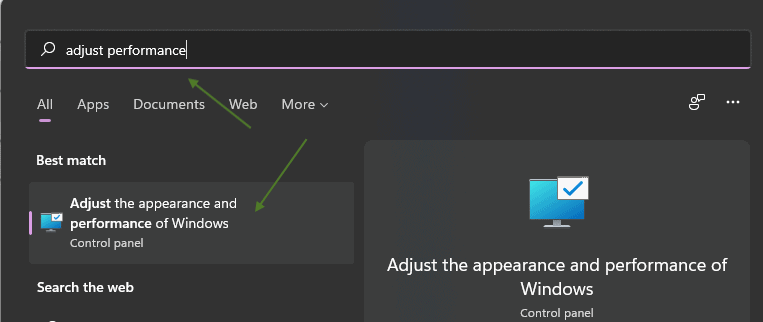
Step 1: Open Start menu and type “adjust performance“. Click on “Adjust the appearance and performance of Windows“.
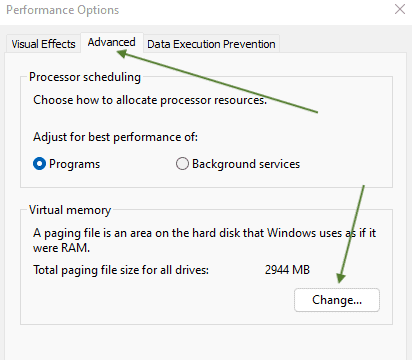
Step 2: Go to the “Advanced” tab, click on the “Change” button under the “Virtual memory” tab.
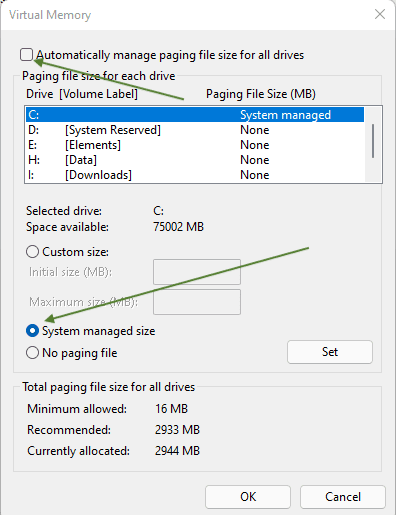
Step 3: Disable the “Automatically manage paging file size for all drives” option and enable the “System managed size” option. Click on “OK” to save the changes.
Method # 4: Update Drivers
Updating drivers for the devices connected to your PC can fix a lot of issues sometimes, such as this one.
Here’s how you can update your device’s drivers.
Step 1: Open Start menu and type “Device Manager” and open it.
Step 2: Right-click a device on Device Manager’s window and click on “Scan for hardware changes“.
Your device will be automatically updates if there are any available updates.
Method # 5: Scan PC for Viruses
It is also highly recommended to run a virus scan over your PC via your desired antivirus, as it can sort this issue out.
Some viruses are known to trigger high CPU usage, that is why you should run a virus scan to eliminate this cause.
These were some of the methods to help you in resolving this issue, hopefully these method prove helpful to you.